
Laravel framework provides a very nice way of subscribing to channels and listening to events. In this article, we will explore how we can receive broadcasted events from the Laravel web app in android applications, all while using WebSockets.
The first section of this article will describe Laravel web application setup and the second section will describe how we can integrate Socket IO in an android application.
If you are interested in the Android part of the article, you can skip the web setup section. At the end of the article are the links to the source code of both applications, so you can test the whole setup.
Laravel Web Application Setup
The main purpose of the Laravel web application is to create/broadcast messages to available clients. In our web application we’ll use Redis broadcaster with Socket.IO server. In this section, we’ll show all the steps required for the Laravel web application to send broadcasted messages via WebSocket.
The Redis broadcaster will broadcast messages from our MessagesController (that we’ll create later) using pub/sub feature. We’ll pair it with a Socket IO server so we can receive messages from Redis and broadcast them to Socket IO channels.
So, the very first thing is to install Laravel Echo:
npm install --save laravel-echo
and Redis, via composer:
composer require predis/predis
Don’t forget to set Redis as broadcast driver in .envfile:
BROADCAST_DRIVER=redis
And specify Redis properties:
REDIS_CLIENT=predis
REDIS_PREFIX=""
Next, we are going to pair Redis broadcaster with Socket.IO server. Because we want to receive and send messages in web application (and also in android application), we’ll need to install the appropriate Javascript library:
npm install — save socket.io-client
After installing Socket.IO Javascript client, we need to instantiate global Echo object with Socket.IO as broadcaster (in resources/js/bootstrap.js).
import Echo from 'laravel-echo';

window.io = require('socket.io-client');

window.Echo = new Echo({
    broadcaster: 'socket.io',
    host: window.location.hostname + ':6001'
});
After specifying Echo object, we need to execute the following command in order to include it in our app.js (that we are going to use later) for listening of Echo events in our web app:
npm install
npm run dev
Now we are very close to the finishing of Laravel dependencies configuration process. The very last thing is to install Socket.IO server. Because Laravel doesn’t come with the Socket.IO server included, we’ll use the community driven Socket.IO server: https://github.com/tlaverdure/laravel-echo-server In order to install the laravel-echo-server we need to execute the following command:
npm install -g laravel-echo-server
After installing, we need to initialize the laravel-echo-server by executing the following command:
laravel-echo-server init
and when the echo server configuration is done, we can start it by running the following command:
laravel-echo-server start
If the server is successfully started, you’ll get the following output:
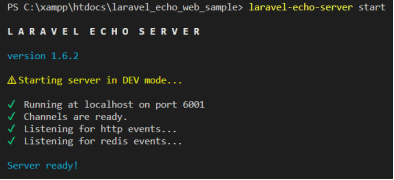
By completing the laravel-echo-server installation, we have preconfigured everything that is important on our Laravel web application side in order to send messages via Laravel Echo. So, in the next step we are going to make a controller that will send Laravel Echo messages. Before creating a controller that will send our messages, let us explain a little bit about how those messages can be sent.
Events that Laravel app will send are broadcasted over channels, which can be public or private. In our sample we’ll use a public channel, but if you want to prevent unauthorized users from listening channel events, you can register for a private channel. Let us now create an event called MessageCreated class in app/Events folder), that will be sent when we want to send a Laravel Echo message to our subscribers (web app and android app):
<?php

namespace App\Events;

use Illuminate\Broadcasting\Channel;
use Illuminate\Contracts\Broadcasting\ShouldBroadcast;

class MessageCreated implements ShouldBroadcast
{
    public $message;

    public function __construct($message)
    {
        $this->message = $message;
    }

    public function broadcastOn()
    {
        return new Channel('messages');
    }
}
In constructor, we are specifying the message that will be sent to all the clients, while the broadcastOn method specifies the channel name which will be receiving those messages. The next step is to finally create our MessagesControllerthat will use the MessageCreated event that we created previously. MessageCreated classevent that we created previously.
<?php

namespace App\Http\Controllers;

use App\Http\Controllers\Controller;
use Illuminate\Http\Request;
use App\Events\MessageCreated;

class MessagesController extends Controller
{
    protected function index()
    {
        return view('messages');
    }

    protected function sendMessage(Request $request)
    {
        $message = $request->message;
        broadcast(new MessageCreated($message));
        return response()->json([
            'status' => 'message is sent successfuly!'
        ]);
    }
}
We should add the route to method sendMessage() in web.php .
Route::post('messages', 'MessagesController@sendMessage');
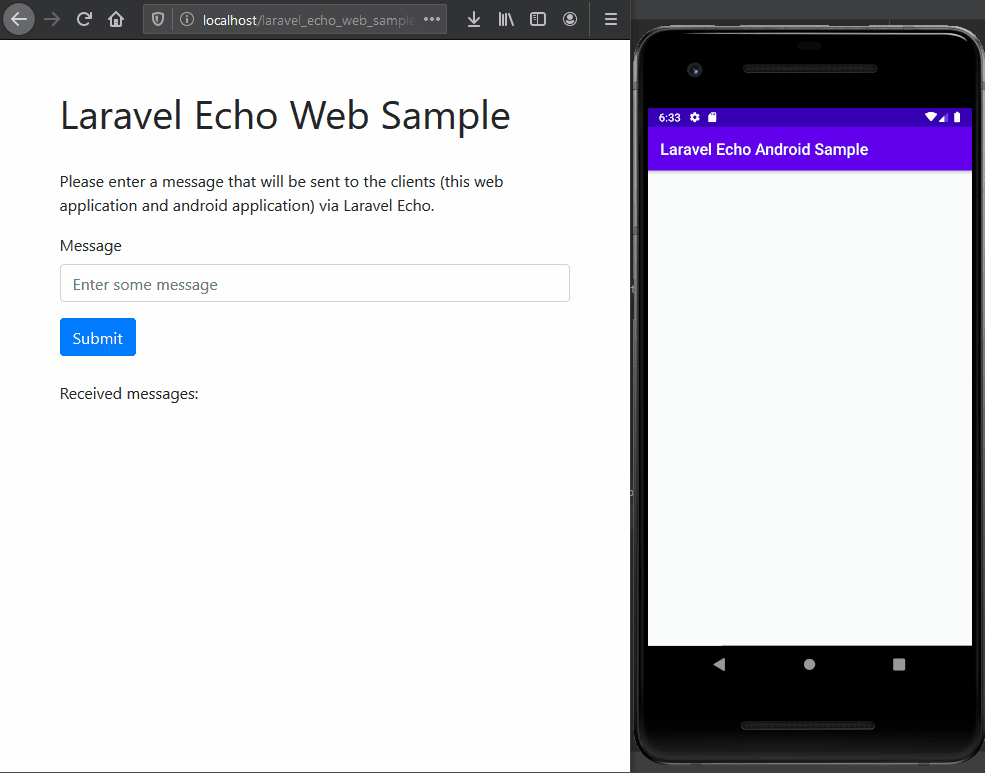
In order to display a form to user where the user can specify the message that will be sent to clients, we need to make an appropriate viewmessages.blade.php).
<form id="newMessageForm" action="">
  <div class="form-group">
      <label for="messageInput">Message</label>
      <input type="text" class="form-control" id="messageInput" placeholder="Enter some message">
  </div>
  <button id="submitButton" type="submit" class="btn btn-primary">Submit</button>
  <br/><br/>
  <div class="form-group">
    <label for="messagesList">Received messages:</label>
    <ul id="messagesList" class="list-group">
    </ul>
  </div>
<input type="hidden" name="trp-form-language" value="en"/></form>
Our form consists of an input field where the user can write a message, a submit button and a container for received messages (since the web application is also a client that can receive messages). In the messages view, we need to add some methods for listening Echo events and methods for sending messages:
    <script src="//{{ Request::getHost() }}:6001/socket.io/socket.io.js"></script>
    <script src="{{ asset('/js/app.js') }}"></script>
    <script src="https://code.jquery.com/jquery-3.5.1.min.js"></script>
    <script>
      $("#newMessageForm").submit(function(event) {
        event.preventDefault();
        const message = $("#messageInput").val();
        if (message === "") {
          alert("Please add some message!");
          return;
        }
        postMessageToBackend(message);
      });

      function postMessageToBackend(message) {
        $.post("messages", {
          "_token": "{{ csrf_token() }}",
          "message": message
        }).fail(function() {
          alert("Error occurred during sending the data. Please retry again later.");
        })
      }

      window.Echo.channel('messages').listen('MessageCreated', (e) => {
        addMessageToList(e.message);
      });

      function addMessageToList(message) {
        const newLi = `<li class="list-group-item">${message}</li>`;
        $("#messagesList").prepend(newLi);
      }
    </script>
A very important part of code listing from above is the line
window.Echo.channel(‘messages’)
where our web application is listening for MessageCreated event in the messages channel. Method postMessageToBackend() is executing asynchronous POST request and it creates new message broadcast. It’s invoked when user clicks on the submit button. Route to the MessagesController, specified in web.php:
Route::get(‘messages’, ‘MessagesController@index’);
Now is the time to start our web application:
php artisan serve
and by browsing the following url, we can see our messages form:
http://localhost:8000/messages
Now we are finished with the simple Laravel Application, so we can start with the Android application implementation.
Android Socket.IO Client Setup
The Android application will establish the connection with the Laravel Echo server, receive broadcasted messages, and display them on the screen. The main screen will have a simple layout - only one TextViewthat will show all received messages:
<?xml version="1.0" encoding="utf-8"?>
<androidx.constraintlayout.widget.ConstraintLayout xmlns:android="http://schemas.android.com/apk/res/android"
    xmlns:app="http://schemas.android.com/apk/res-auto"
    xmlns:tools="http://schemas.android.com/tools"
    android:layout_width="match_parent"
    android:layout_height="match_parent"
    tools:context=".MainActivity">

    <TextView
        android:id="@+id/text_message"
        android:layout_width="wrap_content"
        android:layout_height="wrap_content"
        android:textSize="20sp"
        tools:text="Message"
        app:layout_constraintBottom_toBottomOf="parent"
        app:layout_constraintLeft_toLeftOf="parent"
        app:layout_constraintRight_toRightOf="parent"
        app:layout_constraintTop_toTopOf="parent" />

</androidx.constraintlayout.widget.ConstraintLayout>
In order to make the socket connection to our Laravel Echo server, we need to import an appropriate library in the Android project:
implementation ‘com.github.MrBin99:LaravelEchoAndroid:1.03’
This library will allow us to connect to the socket server and to receive messages sent from the server. We are going to create a BaseActivity, a class that will be our base class containing all the required functionality for connecting to the echo server:
const val SERVER_URL = "http://10.0.2.2:6001"
const val CHANNEL_MESSAGES = "messages"
const val EVENT_MESSAGE_CREATED = "MessageCreated"
const val TAG = "msg"

open class BaseSocketActivity : AppCompatActivity() {

    private var _receivedEvent = MutableLiveData<Any>()
    var receivedEvent = _receivedEvent

    private var echo: Echo? = null

    protected fun connectToSocket() {
        val options = EchoOptions()
        options.host = SERVER_URL

        echo = Echo(options)
        echo?.connect(object : EchoCallback {
            override fun call(vararg args: Any?) {
                log("successful connect")
                listenForEvents()
            }
        }, object : EchoCallback {
            override fun call(vararg args: Any?) {
                log("error while connecting: " + args.toString())
            }
        })
    }

    protected fun listenForEvents() {
        echo?.let {
            it.channel(CHANNEL_MESSAGES)
                .listen(EVENT_MESSAGE_CREATED) {
                    val newEvent = MessageCreated.parseFrom(it)
                    displayNewEvent(newEvent)
                }
        }
    }

    protected fun disconnectFromSocket() {
        echo?.disconnect()
    }

    private fun log(message: String) {
        Log.i(TAG, message)
    }

    private fun displayNewEvent(event: MessageCreated?) {
        log("new event " + event?.message)
        _receivedEvent.postValue(event)
    }
}
In the code above, we can see that we have a few socket-related methods. Methods connectToSocket() and disconnectFromSocket() are methods that are responsible for connecting or disconnecting from WebSocket. Method listenForEvents() is method that is called after we have established a successful socket connection and its main job is to ‘listen’ for events that are broadcasted from our socket backend.
In order to receive the socket broadcast, we must specify the same ‘channel’ and ‘message’ as it is defined in backend configuration. After we have received a socket broadcast message, we have to parse its content. For that, we are using the parseFrom()method from a companion object of MessageCreated class.
class MessageCreated(
    val message: String
) {

    companion object {
        fun parseFrom(value: Array<Any>): MessageCreated? {
            val messageData = value[1] as org.json.JSONObject
            try {
                return Gson().fromJson(messageData.toString(), MessageCreated::class.java)
            } catch (e: Exception) {
                e.printStackTrace()
            }
            return null
        }
    }

}
In order to parse the received message, we are going to use Gson library, so we need to import it in our app/build.gradle file:
implementation ‘com.google.code.gson:gson:2.8.6’
We also need to add an appropriate repository location, from which this library will be fetched, in the project level build.gradle file:
allprojects {
    repositories {
        maven { url 'https://jitpack.io' }
    }
}
After we have created a BaseSocketActivity we can set our MainActivity to inherit the BaseSocketActivity and call the appropriate methods for establishing and destroying the socket connection:
class MainActivity : BaseSocketActivity() {

    override fun onCreate(savedInstanceState: Bundle?) {
        super.onCreate(savedInstanceState)
        setContentView(R.layout.activity_main)
        connectToSocket()
        initLiveDataListener()
    }

    override fun onDestroy() {
        super.onDestroy()
        disconnectFromSocket()
    }

    private fun initLiveDataListener() {
        receivedEvent.observe(this, Observer {
            displayEventData(it)
        })
    }

    private fun displayEventData(event: Any) {
        if (event is MessageCreated) {
            text_message.apply {
                val newText = event.message + "\n" + this.text.toString()
                text = newText
            }
        }
    }
}
Since the cleartext HTTP traffic is not explicitly permitted, we need to specify that in the network security configuration res/xml/network_security_config.xml):
<?xml version="1.0" encoding="utf-8"?>
<network-security-config>
    <domain-config cleartextTrafficPermitted="true">
        <domain includeSubdomains="true">10.0.2.2</domain>
    </domain-config>
</network-security-config>
and include this file as an application tag property of our manifest, like:
android:networkSecurityConfig="@xml/network_security_config"
Finally, don’t forget to set the internet permission in manifest:
<uses-permission android:name="android.permission.INTERNET" />
Now you can test everything in an android emulator. It is important to specify the socket backend url as:
so we can connect to our Socket IO server on our local computer.
Links to web/android application sample code:
- https://github.com/zsasko/laravel-echo-web-sample
- https://github.com/zsasko/laravel-echo-android-sample
Congratulations, you can now test sending messages from a web application to an Android application, using Laravel Echo.
If you have any questions on this or any other tech topic, feel free to reach out anytime.
22 Mar 2021